HiWIRE® Anatomy
Other CAD programs often feature a bewildering array of clickable widgets, sometimes arrayed on all four sides of the subject drawing(s). In contrast, the HiWIRE® user interface may at first seem startlingly austere.
Don't worry; all the features are there; HiWIRE® just doesn't bludgeon you with them. Here's a peek at what you'll see while you're editing your drawing.
The Main Window
As you create or change your drawing, HiWIRE displays it in its main window:
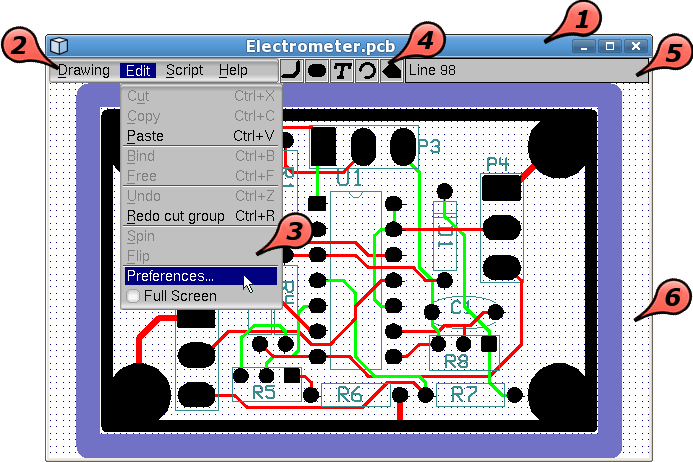 |
Figure 1A |
Title bar – Not drawn by HiWIRE. Appearance and position may vary depending on operating system, look-and-feel settings, etc. For example, HiWIRE announces the name of the drawing, but it may or may not be displayed.
Menu bar – Selects operations of four general types:
Drawing – Loads whole drawings or objects from a library, saves your work and stops HiWIRE when you've finished working.
Edit – Controls the characteristics of new objects you add to your drawing and manipulates the characteristics of objects already there.
Script – Runs Python® scripts that print, photoplot, analyze your drawing, etc.
Help – Browses this manual and helps you get back to your drawing if you accidentally scroll too far away.
Drop-down menu – From one of the four general types, you choose a specific operation with your mouse or keyboard. Invalid choices are dimmed. Here the user is about to select “Preferences…” from the “Edit” drop-down menu. From now on we'll denote this as Edit->Preferences….
Parts bins – Contain new primitives you can add to your drawing: lines, pads, text, arcs, and polygons.
Status line – Displays current position and information about items you pick (by simply pointing at them).
Viewport – Displays part or all of your drawing. A periodic dot grid may be displayed. Objects snap to this grid to aid alignment.
Many common operations offer keyboard shortcuts so you don't have choose operations from the menu. For example, pressing and holding the Ctrl key while pressing and releasing X peforms the same task as selecting Edit->Cut. See Figure 1A, above.
Preference Dialog
Selecting Edit->Preferences… displays the preference dialog:
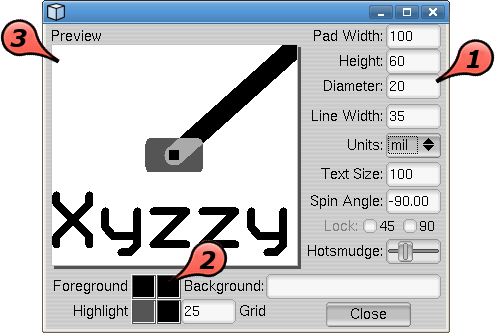 |
Figure 1B |
A column of controls where you
Enter numeric values to control pad shape and line width.
Select the the units you prefer. E.g., mm for millimeters or in for inches.
Select the relative size of label text from 1 (microscopic) to 65535 (gigantic).
Constrain lines to 45- or 90-degree angles, or allow them to run in any direction.
Tighten or relax the accuracy required to pick an object in your drawing.
Along the bottom of the dialog, you control the colors of the background, grid and objects on the current layer where you're working and any additional secondary layers you'd like to see underneath.
Foreground sets the normal color of objects on the current layer.
Highlight sets an alternate color used for objects you're moving or changing. Picked objects are tinted using the highlight color to change their appearance.
You specify the grid spacing in your preferred units.
The preview panel displays the result of your settings. The pad is shown as if being moved; a small square knob is displayed in the pad center to give you a sense of how closely you must point at an object to pick it.
The preference dialog tracks the zoom level and layer changes you make in the main window. You can leave it open while you work or dismiss it by clicking its Close button.
If the highlight color is the same as the foreground, the object will disappear when you pick it. If the same as the background, its appearance won't change. Preview picked-object color in the region where the pad and line overlap.
Other Dialogs
HiWIRE uses a handful of other dialog windows to gather needed information or issue status reports.
 |
Figure 1C |
Clockwise from left, Figure 1C shows three important ones:
A Chooser dialog for selecting the drawing you want to edit. It is also used to fetch an item from a library. The left pane displays a tree of directories, files and library content; the right pane previews any item before you open it or insert it into your drawing.
A Save dialog asks where to save your drawing. You can change any filename HiWIRE suggests.
An Error dialog describes what went wrong (but not necessarily how to fix it). Fortunately this dialog is seldom displayed.
Much of HiWIRE's GUI is built up from FLTK interface elements or widgets. The widget capabilities, specifically those of the text-entry element used in HiWIRE's Edit->Preferences… dialog and elsewhere, are somewhat bedazzling. Furthermore, widget behavior may even change from time to time as improvements are made to FLTK.
To avoid the confusion and clutter of unnecessary detail, we won't discuss FLTK operation here. If you're thirsty for more information, go to the website.
It suffices to say the widgets work the way you expect, and you're unlikely to need some of the more advanced capability the toolkit provides.